I broke down this morning and sketched out my garden for next summer. I've already received four seed catalogs (two of them came before Thanksgiving). Seed catalogs are kind of like Christmas decorations at Hobby Lobby: they come earlier every year!
When I say I "sketched" my garden, it really means I drew it in AutoCAD. I'm a nerd. But it's easier than drawing it on graph paper. I already have my 2009 and 2010 garden in CAD so it's just a matter of copying over the bed layouts and rearranging the plant spread circles.
According to the drawing, next year I will have:
8 tomatoes (so hard to only have 8!)
18 peppers and eggplant (This is difficult too!)
So now I have to decide which varieties to plant.... I have leftover seed from last year that I will re-use. Black Cherry, Amish Paste, Thessaloniki and Cour di Bue tomatoes. Several types of peppers and eggplant. Before I know it I will need to start my seeds!

Sunday, December 19, 2010
Saturday, December 18, 2010
Christmas Cookie Baking
I thought I should make some notes about cookie baking as I think this is what I will do for the menfolk presents unless I hear they dislike cookies.
This year I bought cookie boxes instead of the bags I used last year and decided to give everyone an assortment instead of all one type of cookie.
I made one batch each of chocolate toffee shortbread (from Farmgirl Fare's blog), chocolate chip and oatmeal raisin (both from Grandma Ettling) and chocolate crinkles. This was for six boxes of cookies (Gabe, Dad, Daniel, Troylee, Collin, Tom).
I used:
butter (2 boxes)
leftover bag of powdered sugar
flour (about half a bag)
white sugar (about half a bag)
brown sugar (about half a bag)
quick oats (about half a canister)
eggs (a dozen)
vanilla (about 1 oz.)
bag of toffee bits
baking chocolate (half a box)
raisins (about half a bag)
Plus the other odds and ends necessary for baking such as baking powder, baking soda and salt, but I always have those on hand and didn't feel the need to count them.
I was prepared to make white chocolate chip/pecan and peanut butter cookies but had enough.
For future reference,
Chocolate chip 6 dozen
shortbread 2 dozen
oatmeal raisin 3 dozen
chocolate crinkles 3 dozen
It should also be noted that I use a cookie scooper that is 1 1/2 Tbsp so I have consistently sized cookies.
There are about 2 dozen cookies in each box.
Friday, November 19, 2010
Heaven and Hell
I went to a lecture today, given by one of my professors from Greece. He spent the last three years in Dubai teaching at the University there, and also on sabbatical. At one point he was speaking about the desert and about the gardens that are in the desert, that are like mirages. He compared the desert to hell.
His lecture got me thinking about whether Heaven and Hell are literal. The Tigris-Euphrates is often referred to as the cradle of civilization, one of the few places where life began on this earth. Some historians believe this area is where the biblical Garden of Eden was located. The area around the Tigris-Euphrates region is desert, current day Iraq.
Gardens in the desert have a paradise quality. I experienced first hand some beautiful gardens located in Alexandria, Egypt, also a desert area. They did seem to come out of nothing, and were miraculous in the fact that they could even grow in such an extreme environment.
This website gives the origin of the word "eden" as meaning luxurious or pleasure: http://www.abarim-publications.com/Meaning/Eden.html
Essentially, the Garden of Eden was a place where a person would not suffer. In the desert a person suffers.
Saturday, November 13, 2010
Poet
I wrote a poem last Saturday while shivering in the deer stand. The Hubs and I were up before the crack of dawn to trek through the field to our deer stand. Not long after dawn there was a gun shot very close and then I caught glimpse of a hunter up the hill, running. Turned out it was Bucky's step-dad.
Anywho, the poem is only a four liner, and the first poem I've written since high school (7 years ago).
I saw another hunter
through the trees,
Hunter safety orange
against the autumn leaves.
And yes, the explanation of the poem was longer than the poem.
Anywho, the poem is only a four liner, and the first poem I've written since high school (7 years ago).
I saw another hunter
through the trees,
Hunter safety orange
against the autumn leaves.
And yes, the explanation of the poem was longer than the poem.
Wednesday, November 10, 2010
Crockpot Scalloped Potatoes with Ham
This is another recipe from the "Fix it and Forget it" cookbook.
Scalloped Potatoes with Ham
6 cups sliced potatoes (I used new potatoes, red and yukon gold, that I purchased from the farmer's market)
salt and pepper to taste
1 can cream of mushroom soup, mixed with 1-1/2 c. milk
1 lb ham, cooked and cubed
Layer the potatoes in the crockpot, salting and peppering each layer. Pour the soup/milk mixture over the potatoes, and place the ham on top. Cook for 3-1/2 to 4 hours on high, until potatoes are tender.
Note:
I used cured ham steak and could have cut back on the salt.
There doesn't appear to be much liquid in the crockpot, but the soup doesn't really soak in to the potatoes.
I stirred the mixture a couple times, probably at the 1 and 2 hour cooking mark.
I ate this for breakfast this morning. It would have been good paired with over medium eggs.
Sunday, November 7, 2010
Bucket List
I decided it was time I wrote down my bucket list, so I could start crossing places off of it.
Requiring passport:
Paris
London (and the surrounding area: old castles)
Dubai
Italy (Vatican City, Rome, Venice)
Spain (Barcelona, Grenada)
China (Beijing, Great Wall)
India (New Delhi, Taj Mahal)
Turkey (Istanbul)
Cuzco, Peru (Machu Picchu)
Australia (Great Barrier Reef)
Not requiring passport:
Hawaii
New York City
Colorado - skiing with the hubs
Washington DC
North Carolina (Biltmore Estate)
Grand Canyon
Yosemite
Yellowstone
Sequoia National Park
I'm sure there are more places; I'll update the list as I think of them.
Monday, November 1, 2010
Tamale Pie
Another slow cooker recipe! I asked the Hubs to go through the cookbook and put sticky notes on the recipes he wants to try.
Tamale Pie
3/4 c cornmeal
1 1/2 c milk
1 egg, beaten
1 lb ground beef, browned and drained (I used ground pork since we just bought half a hog)
1 envelope dry chili seasoning (I didn't have this, so I used a mixture of chili powder, salt, cumin, garlic powder)
16 oz can diced tomatoes (I used a pint of home-canned tomatoes)
16 oz can corn, drained
1 c shredded cheddar
Spray the inside of the slow cooker with non-stick spray.
Mix together cornmeal, milk and egg in crockpot. Mix in meat, tomatoes, seasoning and corn.
Cook, covered, on high for 1 hour, then on low 3 hours. (I forgot to turn it down after an hour, so I cooked it 3 hours on high)
Sprinkle with cheese and cook about 5 minutes for cheese to melt. (I sprinkled the cheese, put the lid back on and then turned off the slow cooker.)
Note:
I doubled the cornmeal, milk, egg and meat.
I still had fresh peppers from the garden so I added about 6 diced anaheim and poblano.
Sunday, October 31, 2010
Sun Chip bag composting
Today marks Day 1 of the Sun Chip bag in the composter. I believe the commercial showed it taking 14 weeks to compost. According to the handy dandy date calculator in Excel, this will be February 6, 2011. Add in a couple extra weeks because of the cold weather, and by lettuce and pea planting season of next year, the bag should be gone.
Wednesday, October 27, 2010
Crockpot Chicken Stuffing
A couple years ago for Christmas, Aunt Lisa gave us a slow cooker book called "Fix it and Forget it Big Cookbook" because I mentioned to her that we use the crockpot a lot. It's easier for us to make dinners like this since the Hubs and I work different shifts. I work 8-5 and he works 3:30 to midnight, and sometimes later.
Chicken, Corn and Stuffing
4 boneless skinless chicken breasts
6 oz box chicken stuffing (like Stove top)
16 oz package frozen corn
1/2 stick butter, melted
2 c water
Place chicken in bottom of bowl. Mix together remaining ingredients and pour over chicken.
Cook, covered, for 2 1/2 hours on high.
Notes:
1. Spray the cooker with non-stick spray before putting the chicken in, or the stuffing will stick to the sides.
2. Check the chicken for done-ness after 2 1/2 hours. I had to cook it a little longer because the inside was still pink. Next time, I will probably cut the chicken breast in half so they cook faster, or use chicken tenderloins instead.
Tuesday, October 26, 2010
Merlot #1
Switching gears from Chardonnay to Merlot... The first merlot I purchased was Lindemans Bin 40 Merlot.
While not bad chilled, it definitely tastes better closer to room temperature.
What I like most is that right on the bottle it tells you the timeframe in which to drink it: three years past bottling. The bottle I purchased was a 2009, so if I purchase more I should drink it before 2012. I'd purchase this again.
This wine (the first two glasses of the bottle anyway) were drank after two long nights of studying for my upcoming structures exam.
Monday, October 18, 2010
Tamale adventure
Yesterday I decided to make tamales. What an adventure. Everytime I make Mexican food, it turns into an all day ordeal. Which is probably why it always tastes so good.
After much searching yesterday, I found a tamale recipe. The only one I could find that was a reasonable size was on foodnetwork.com, which I was trying to avoid for authenticity sake, but all the other recipes called for nearly 10 pounds of pork, and for just the two of us, that's way too much meat. (Even though sometimes I feel like a carnivore and not an omnivore in this house!)
The first task yesterday was finding a steamer. Part of the reason I'd been putting off making tamales was because I didn't have a steamer. Well, yesterday I got a killer deal on one, unintentionally. I did a little online searching, and then decided to hit up several stores: Target, Bed Bath & Beyond, Marshall's and the JC Penney Home Store. Turns out the last place I went had the best deal. Target's was $40. Bed Bath and Beyond ranged from $100 to $200, so even with my $5 off coupon, well you get the idea of the price. Marshall's didn't have one (although I did purchase a new bread knife!). Penney's had one online on sale for $40, but it wasn't in the store. What they did have in the store was $60 regular price, which was half off. Then I had a 20% off coupon. And unknown to me, there was a $20 mail in rebate. So after I get the rebate back, I'll have purchased a $60 item for about the price of tax: $5-ish!
Here's a link to the original recipe:
http://www.foodnetwork.com/recipes/all-american-festivals/traditional-pork-tamales-recipe/index.html
Here's how I tweaked it:
Pork:
3 lbs boston butt pork, trimmed of fat
1 head of garlic, sliced crosswise into 2
palmful white peppercorns (didn't have any black ones on hand)
4 bay leaves
1 tsp salt
Water to cover pork in stock pot by 3 inches.
Masa: (ended up doubling this, and could have tripled it, but we decided to eat tacos while waiting on the tamales to cook)
1 1/2 c masa harina
3/4 tsp baking powder
3/4 tsp salt
1 tsp ground cumin
3 Tbsp softened butter
1/3 c shortening
3/4 c broth from pork, enough to make the masa spreadable, about the consistency of play-doh
Chile Sauce
2 dried ancho chiles
3 fresh anaheim chiles, diced finely
1 qt tomatoes
4 cloves garlic, minced
2 tsp salt
2 tsp cumin
3 tsp salt
2 c broth from pork
2 Tbsp olive oil
2 Tbsp flour
Corn husks, softened in a bowl of warm water at least 30 minutes prior to assembly
Pork preparation:
Bring the pork to a boil, then reduce heat and simmer for about 1-1/2 hours, until it falls off the bone easily. Add water if needed. Turn off heat, and pull the pork apart with forks in a bowl.
Chile Sauce:
In a nonstick skillet, cook the chiles and tomatoes until the anchos are softened. Take the dried chiles (now rehydrated) out of the skillet and rinse the seeds out under running water. If you want more heat, you could leave the seeds in. Transfer all the chiles and the tomatoes to a food processor and process until smooth. Add the salt, garlic, cumin and salt to processor. In the nonstick skillet, heat the olive oil and add the flour. Then transfer the chile sauce to the skillet and simmer to reduce the liquid.
Once the liquid is reduced, add the shredded pork.
Tamale dough:
Mix the ingredients. I used a wooden spoon, until I remembered I had a pastry blender that worked even better. The dough was sticking to the spoon.
Spread about 2 Tbsp tamale dough on a corn husk. Spoon about 1-2 Tbsp (depending on size of corn husk) pork mixture into dough. Wrap the tamale and tie with a string of corn husk. Place on end in the steamer basket.
Steam for about 1 hour, adding more water if necessary.
These were delicious; I would almost say they were better than any tamales I've ever had, including the ones from the Mexican restaurants.
We made tacos with the extra pork filling. Flour tortillas, refried beans, sour cream, shredded cheese, and homemade guacamole.
After much searching yesterday, I found a tamale recipe. The only one I could find that was a reasonable size was on foodnetwork.com, which I was trying to avoid for authenticity sake, but all the other recipes called for nearly 10 pounds of pork, and for just the two of us, that's way too much meat. (Even though sometimes I feel like a carnivore and not an omnivore in this house!)
The first task yesterday was finding a steamer. Part of the reason I'd been putting off making tamales was because I didn't have a steamer. Well, yesterday I got a killer deal on one, unintentionally. I did a little online searching, and then decided to hit up several stores: Target, Bed Bath & Beyond, Marshall's and the JC Penney Home Store. Turns out the last place I went had the best deal. Target's was $40. Bed Bath and Beyond ranged from $100 to $200, so even with my $5 off coupon, well you get the idea of the price. Marshall's didn't have one (although I did purchase a new bread knife!). Penney's had one online on sale for $40, but it wasn't in the store. What they did have in the store was $60 regular price, which was half off. Then I had a 20% off coupon. And unknown to me, there was a $20 mail in rebate. So after I get the rebate back, I'll have purchased a $60 item for about the price of tax: $5-ish!
Here's a link to the original recipe:
http://www.foodnetwork.com/recipes/all-american-festivals/traditional-pork-tamales-recipe/index.html
Here's how I tweaked it:
Pork:
3 lbs boston butt pork, trimmed of fat
1 head of garlic, sliced crosswise into 2
palmful white peppercorns (didn't have any black ones on hand)
4 bay leaves
1 tsp salt
Water to cover pork in stock pot by 3 inches.
Masa: (ended up doubling this, and could have tripled it, but we decided to eat tacos while waiting on the tamales to cook)
1 1/2 c masa harina
3/4 tsp baking powder
3/4 tsp salt
1 tsp ground cumin
3 Tbsp softened butter
1/3 c shortening
3/4 c broth from pork, enough to make the masa spreadable, about the consistency of play-doh
Chile Sauce
2 dried ancho chiles
3 fresh anaheim chiles, diced finely
1 qt tomatoes
4 cloves garlic, minced
2 tsp salt
2 tsp cumin
3 tsp salt
2 c broth from pork
2 Tbsp olive oil
2 Tbsp flour
Corn husks, softened in a bowl of warm water at least 30 minutes prior to assembly
Pork preparation:
Bring the pork to a boil, then reduce heat and simmer for about 1-1/2 hours, until it falls off the bone easily. Add water if needed. Turn off heat, and pull the pork apart with forks in a bowl.
Chile Sauce:
In a nonstick skillet, cook the chiles and tomatoes until the anchos are softened. Take the dried chiles (now rehydrated) out of the skillet and rinse the seeds out under running water. If you want more heat, you could leave the seeds in. Transfer all the chiles and the tomatoes to a food processor and process until smooth. Add the salt, garlic, cumin and salt to processor. In the nonstick skillet, heat the olive oil and add the flour. Then transfer the chile sauce to the skillet and simmer to reduce the liquid.
Once the liquid is reduced, add the shredded pork.
Tamale dough:
Mix the ingredients. I used a wooden spoon, until I remembered I had a pastry blender
Spread about 2 Tbsp tamale dough on a corn husk. Spoon about 1-2 Tbsp (depending on size of corn husk) pork mixture into dough. Wrap the tamale and tie with a string of corn husk. Place on end in the steamer basket.
Steam for about 1 hour, adding more water if necessary.
These were delicious; I would almost say they were better than any tamales I've ever had, including the ones from the Mexican restaurants.
We made tacos with the extra pork filling. Flour tortillas, refried beans, sour cream, shredded cheese, and homemade guacamole.
Saturday, October 16, 2010
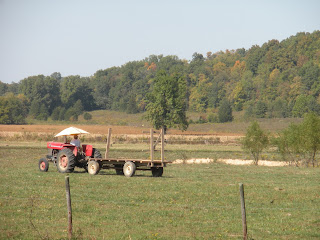
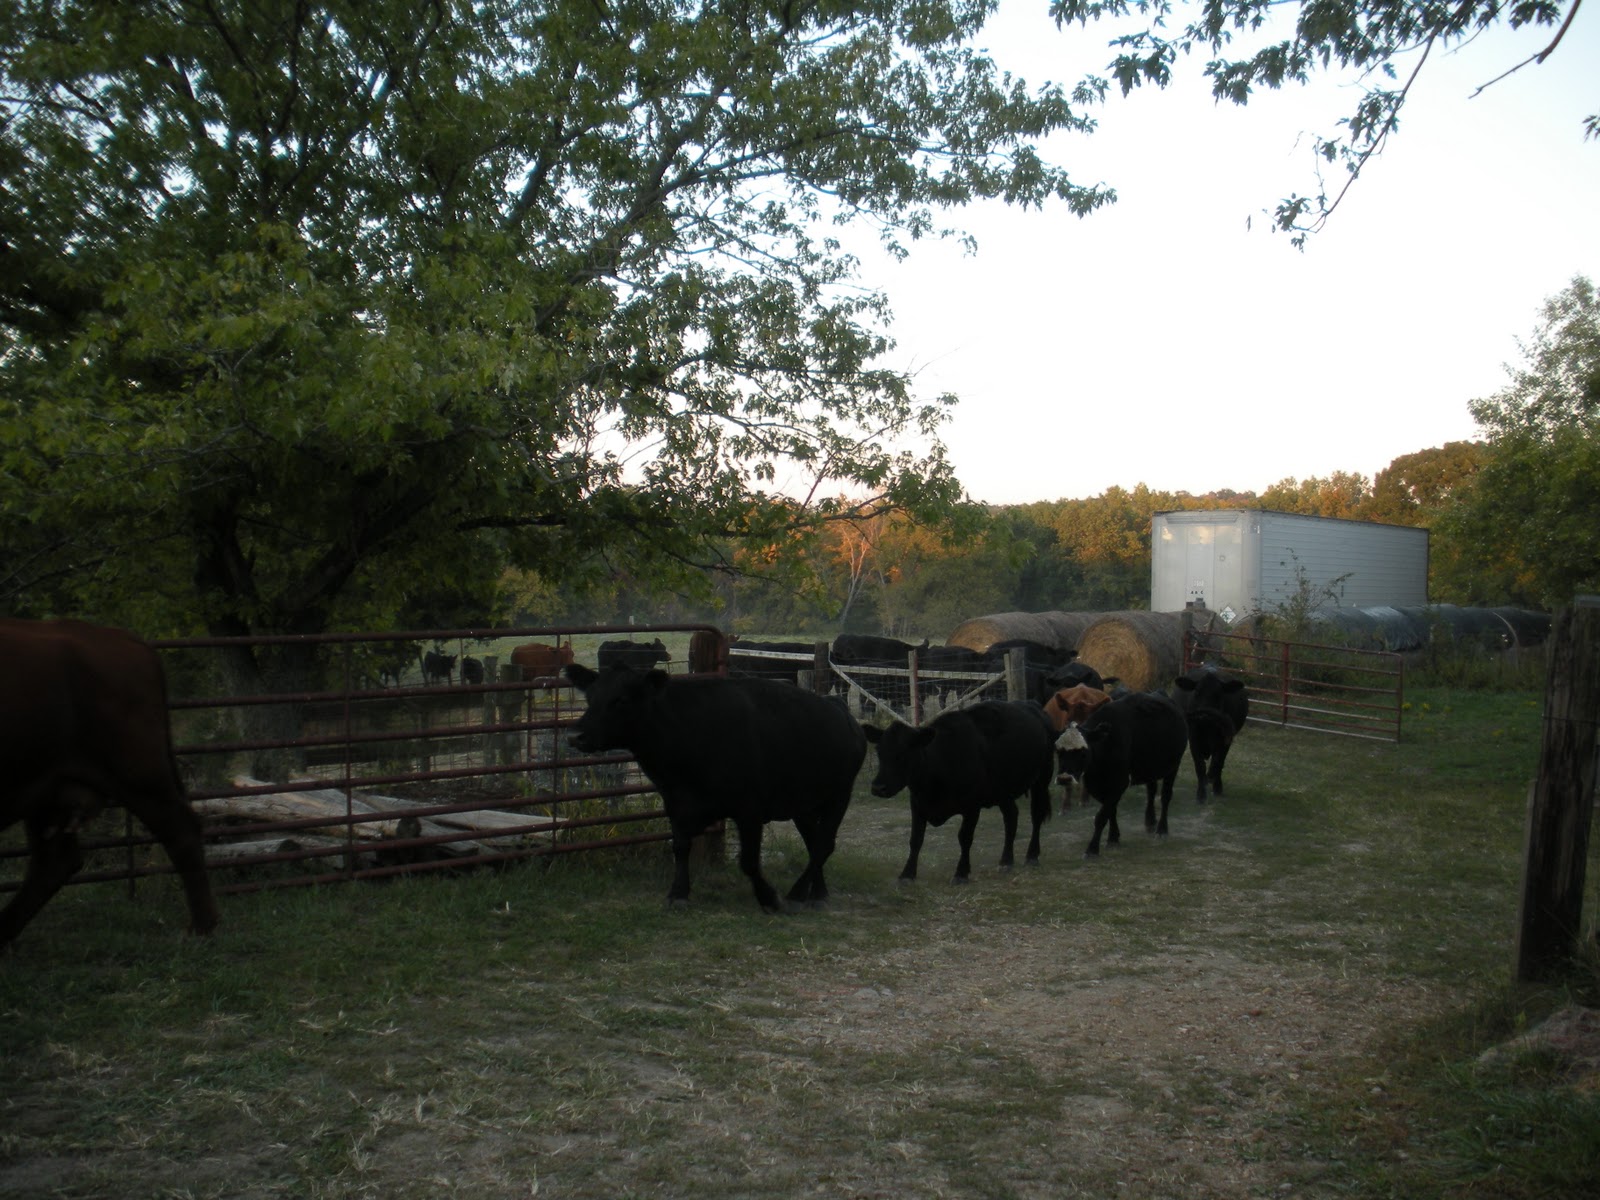
Haybaling: A Family Affair
 |
| On the way down to the bottoms |
 |
| A view of the cows through the trees |

 |
| This is why I love the farm. |

 |
| Yes, that's the tractor I got married on |

 |
| Putting on gloves |
 |
| We had over 170 bales |


 |
| I had fewer bales than Daniel did on his side, so I took a few moments to photograph Mom. |
 |
| Dad stacking. |
 |
| Dad being goofy. |
 |
| For the second half of the field, Dad and Daniel had me drive the tractor. |
 |
| My view on the way up the hill. |

 |
| The tractor I drove up the hill. It didn't like the steep hill, heavy load and gravel. |
 |
| Moving cows from one pasture to another. |

Last weekend I went home to the farm. I was unaware, but Dad cut hay last week. Friday night when I got home, he asked if I would help. Ended up, Mom drove for awhile while my brother Daniel, me, and Dad loaded bales. Then I drove the second tractor, and helped Dad load the bales into the barnloft. Typically this ordeal includes more than four people but we were a little shorthanded this weekend.
Tuesday, October 5, 2010
A couple recipes to share
I've started making big dinners twice a week, so the Hubs and I both have leftovers to eat for lunch and dinner throughout the week. I make one on Sunday night, and then one about midweek, or whenever I've gotten tired of the first dinner. I need variety, and if I eat the same thing for lunch and dinner for more than 2 days in a row I get bored with it and tend to eat out at lunch. Eating out costs more (about $10 per lunch rather than $2 or less if I eat leftovers), and it's also not as good on my waistline. Basically, eating out is a lose-lose situation.
Since reading Michael Pollan's Food Rules book, I did self-impose a rule that if I could only eat out for one meal a day, a maximum of twice a week. So if I get coffee on the way to work on Monday, I have to eat leftovers for lunch and dinner that day, and I only have one more meal to "spend". I try to keep one meal for lunch with coworkers toward the end of the week, when I need a break from my desk.
The lunches I made for this week are Jenny's (my favorite engineer coworker) enchilada casserole (not to be confused with my mother-in-law's casserole, which I'll post some other time), and deer roast.
Jenny's Enchilada Casserole (tweaked a little)
9x9 glass baking dish, greased (I use a Pampered Chef Spritzer that I fill with EVOO) (Jenny uses a pie pan)
Oven set to 350 degrees
About 6-10 tortillas, depending on the number of layers desired. I use corn because the Hubs and I like the texture of corn tortillas better, but flour would work, too.
About 1 lb of hamburger, browned, drained of grease and seasoned with taco seasoning (see note) and 1 can of Rotel
Half a large onion, diced. I use yellow or red onions
Several peppers, diced. I had several banana, anaheim and marconi peppers that were ripe from the garden. If I didn't have fresh from the garden peppers, I probably would omit them. (I don't think Jenny uses peppers)
1 can of refried beans
1 jar of salsa verde (Jenny uses enchilada sauce)
8 oz package of shredded cheddar cheese
After draining and seasoning the ground beef, stir in the onions and peppers and cook until tender, a few minutes.
Cut two tortillas in half and use to edge the bottom of the baking dish. Use a full tortilla to line the middle bottom of the dish.
Spread about half the can of refried beans on the tortillas.
Spread about half the meat/onion/pepper mixture over the beans.
Sprinkle about half the cheese.
Repeat the layers, except spread the salsa on top of the meat, and then sprinkle the top with cheese.
Bake for about 20 minutes, or until cheese is melted.
Note:
I don't typically buy taco seasoning in a packet. I use, to taste, salt, pepper, cumin, garlic powder, chili powder (sparingly) and red pepper flakes (sparingly).
I ate this with avocado slices. I'm sure the Hubs had a side of sour cream as well.
Deer Roast
This recipe is a lot simpler, because it all gets thrown in the crockpot and cooked overnight. Which means I wake up starving at 4 am because the house smells so good!
1 deer roast. The one I used tonight was at least 2 pounds if not more
half an onion, diced (the other half of the onion was used in the enchilada casserole)
About half a dozen large mushrooms, cut in half and then in bite-sized chunks. The mushrooms at Dillon's this time were about 3" in diameter
4 Yukon Gold potatoes (fresh from the Farmer's market last weekend!), cut into bite-sized chunks
1 clove of elephant garlic, minced
Water
Salt and pepper
We have a rather large Crockpot , similar to this one. The crock part comes out and goes into the fridge once it cools. Anywho...
Put the thawed deer roast in the bottom of the crockpot. Put the onions, mushrooms, potatoes and garlic on top. Season with salt and pepper, and then put about 1-2 inches of water in. I've discovered the kitchen sink sprayer comes in handy for putting water in the crockpot. I don't have to hunt down the largest measuring cup, I just bring the crockpot within reach of the sprayer!
I cook the roast overnight, on the 10 hour setting. I think by the time the Hubs gets home (it's been cooking for about 4 hours), he is able to stir it and break up the roast a little. He might even re-start the cook timer.
Since reading Michael Pollan's Food Rules book, I did self-impose a rule that if I could only eat out for one meal a day, a maximum of twice a week. So if I get coffee on the way to work on Monday, I have to eat leftovers for lunch and dinner that day, and I only have one more meal to "spend". I try to keep one meal for lunch with coworkers toward the end of the week, when I need a break from my desk.
The lunches I made for this week are Jenny's (my favorite engineer coworker) enchilada casserole (not to be confused with my mother-in-law's casserole, which I'll post some other time), and deer roast.
Jenny's Enchilada Casserole (tweaked a little)
9x9 glass baking dish, greased (I use a Pampered Chef Spritzer
Oven set to 350 degrees
About 6-10 tortillas, depending on the number of layers desired. I use corn because the Hubs and I like the texture of corn tortillas better, but flour would work, too.
About 1 lb of hamburger, browned, drained of grease and seasoned with taco seasoning (see note) and 1 can of Rotel
Half a large onion, diced. I use yellow or red onions
Several peppers, diced. I had several banana, anaheim and marconi peppers that were ripe from the garden. If I didn't have fresh from the garden peppers, I probably would omit them. (I don't think Jenny uses peppers)
1 can of refried beans
1 jar of salsa verde (Jenny uses enchilada sauce)
8 oz package of shredded cheddar cheese
After draining and seasoning the ground beef, stir in the onions and peppers and cook until tender, a few minutes.
Cut two tortillas in half and use to edge the bottom of the baking dish. Use a full tortilla to line the middle bottom of the dish.
Spread about half the can of refried beans on the tortillas.
Spread about half the meat/onion/pepper mixture over the beans.
Sprinkle about half the cheese.
Repeat the layers, except spread the salsa on top of the meat, and then sprinkle the top with cheese.
Bake for about 20 minutes, or until cheese is melted.
Note:
I don't typically buy taco seasoning in a packet. I use, to taste, salt, pepper, cumin, garlic powder, chili powder (sparingly) and red pepper flakes (sparingly).
I ate this with avocado slices. I'm sure the Hubs had a side of sour cream as well.
Deer Roast
This recipe is a lot simpler, because it all gets thrown in the crockpot and cooked overnight. Which means I wake up starving at 4 am because the house smells so good!
1 deer roast. The one I used tonight was at least 2 pounds if not more
half an onion, diced (the other half of the onion was used in the enchilada casserole)
About half a dozen large mushrooms, cut in half and then in bite-sized chunks. The mushrooms at Dillon's this time were about 3" in diameter
4 Yukon Gold potatoes (fresh from the Farmer's market last weekend!), cut into bite-sized chunks
1 clove of elephant garlic, minced
Water
Salt and pepper
We have a rather large Crockpot
Put the thawed deer roast in the bottom of the crockpot. Put the onions, mushrooms, potatoes and garlic on top. Season with salt and pepper, and then put about 1-2 inches of water in. I've discovered the kitchen sink sprayer comes in handy for putting water in the crockpot. I don't have to hunt down the largest measuring cup, I just bring the crockpot within reach of the sprayer!
I cook the roast overnight, on the 10 hour setting. I think by the time the Hubs gets home (it's been cooking for about 4 hours), he is able to stir it and break up the roast a little. He might even re-start the cook timer.
Monday, September 20, 2010
Garden Report 09.20.2010

Round two of swallowtail butterfly caterpillars. There were 7 at last count, yesterday.


Fall crop of lettuces starting to emerge. Peas in the background.

This is what happens when you don't catch all the dill seeds... it reseeds itself (woot woot!) I love the smell of dill as much as basil and mint.

My loving husband, the Hubs, snorkeling in Lake Stockton. I'm really proud of him; he can swim longer (laps in the pool) than I can run.
Thursday, September 16, 2010
Honey Don't Think
by Grant Lee Buffalo. The number one song on my playlist. I can listen to it, alone, on repeat and never get tired of it.
I don't really have a garden report. There's been so much rain the last week. Some of the lettuce and spinach are coming up. The herbs have been replenished due to the rain. The peppers are setting on more. But pretty much everything else that's a vegetable annual has been pulled up and composted.
Anyway, if Grant Lee Buffalo made a music video of this song, I can't find it. They also went by the name Grant Lee Phillips for a while. Check them out!
Sunday, August 15, 2010
Garden Report 08.15.10


I have four butternut squash set on.

The Quadrato D'Asti Rosso plants are loaded with peppers. The only variety that didn't get blossom end rot this year.

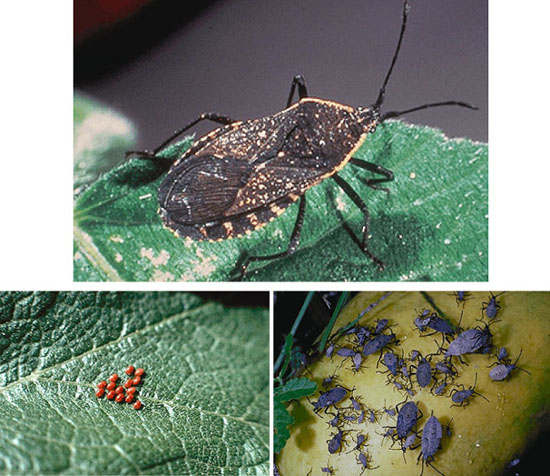
Some mysterious insect eggs on the cucumber plant. I did some research and these are squash bug eggs. I don't want these! http://ipm.illinois.edu/ifvn/volume13/images/squash_bugs.jpg

Canning tomatoes
Many people, when I tell them I can tomatoes (and other veggies) freak out about botulism, and about how long it takes to can. I decided to photograph each step of canning tomatoes to show just how easy it is.
Here's the canning guide I use: http://www.uga.edu/nchfp/publications/uga/uga_can_tom.pdf
The recipe I did today was on page 6, "Tomatoes- Crushed". I made tomatoes the same way last year, and also canned "Tomato Juice" found on page 7 last year. This year, I don't have quite as many tomatoes, but still had too many to eat myself (The Hubs is not a tomato fan). Last year, I made a note in the margin that 8 pounds of tomatoes, precoring, produced 8 pints. This year I had about 5 pounds, and ended up with 5 pints. So it's a good rule of thumb to assume you need a pound per pint.
First things first, start with fresh, ripe, homegrown tomatoes. If you wouldn't eat the blemish that's on the tomato now, you won't want to eat it in 6 months when it's made the whole jar taste funny. Below is a mixture of Thessaloniki, Amish Paste and Cour di Bue tomatoes, all grown from Baker Creek seed. Whatever you do, DO NOT use tomatoes from the store. They are never ripened on the vine and are white in the middle. If you don't have enough tomatoes to can from your garden, go to a farmer's market to get extras.

Next, start water to boiling in your water bath canner pot. It will take forever to start boiling because of the amount of water, so start it first. I use the water bath to sterilize the empty jars too. Since there's just two of us, I use pint jars. Wide mouth pint jars are easier to clean, so if you can find those, use them! Make sure the rims of the jars don't have cracks or chips or they won't seal.
Some handy tools to have include "jar tongs" and a funnel made specifically for canning.
Start water to boiling in a smaller pan. When it boils, add tomatoes a few at a time. This makes it easier to peel the tomatoes. Also, LEAVE THE CORES IN, otherwise you will end up with tomato juice in this pan, and that's not what you want. I think this step stops the tomatoes from ripening any further, a kind of blanching.
When the skins have split, use a ladle to put the tomatoes in a bowl of ice and cold water. This cools them down so they are easier to handle. The skins will fall off the tomatoes now. Discard the skins into your compost bucket, and cut the core out, also into the compost bucket. Quarter the tomatoes and put them in a separate bowl.
After you have boiled, cooled, peeled and cored all the tomatoes, put about 1 pound into a stock pot and bring to a boil. You want to mash up this first pound pretty well so it makes a juice. I use a potato masher. Be careful that you don't splatter the tomatoes on yourself, as they are HOT! After the first pound has come to a boil, add the remainder of the quartered tomatoes. Bring to a boil, and boil for five minutes.
While you're waiting for the tomatoes to come to a boil, get your lids ready. Put them in a small sauce pan with enough water to cover, and bring to a boil.
By now, if you're lucky, your water bath canner is boiling. Keep the lid on and it will come to a boil faster.
The actual canning step I wasn't able to photograph because I was working so fast. You'll take a sterilized jar out of the water bath canner and use a ladle to fill it to the bottom of the threads with tomatoes. Then add 1 Tbsp of lemon juice and 1/2 tsp of salt. Wipe the rim with a dishcloth. Then put a sterilized lid on, and tighten down a ring. THE JAR AND THE LID ARE HOT. USE A (DRY) DISHTOWEL OR POTHOLDER to hold the jar while you're tightening the ring down. Put the full jar back in the water bath canner. Get a new sterilized jar out, and repeat the process until you've used all the tomatoes.
Process in the boiling water canner for 35 minutes for pints. When done, put the jars on a dishtowel on the counter to cool. It's not unusual to have a white powdery substance on the outside of the jars; this is due to chemicals in city water and it will wipe off easily with a dry towel.
Now, you have to wait for the lids to "pop" or seal. All of mine, except one, sealed while in the water bath. The last one sealed within five minutes of being out of the canner. If you can't tell by looking if the lid is sealed, push down gently on the center of the lid. If it moves, it hasn't sealed yet. If you have a jar that doesn't seal, put it in the fridge and use in within a couple days. Once they are cool, write the year and the contents on the lid. For these tomatoes, I'll write "stewed tomatoes 2010".
The number of tomatoes you have will dictate how long the canning process takes. This took a little over an hour. That may seem like a long time, but think of the delicious, homegrown, pesticide free, hormone free (because I used heirloom seeds) tomato juice I'll have for chili and stew this winter. You know you're jealous!
Wednesday, August 4, 2010
Garden Photos 08.04.10

Butternut Squash

Acorn Squash

Okra

Butterfly Caterpillar. I'm glad he took part in the photo shoot this morning at 7:30 because when I went to look for him again this evening he was gone. Hopefully he was hiding under a leaf, and hopefully he didn't get eaten by a bird... According to this website, it's a black swallowtail caterpillar: http://www.whatsthatbug.com/category/caterpillars-and-pupa/butterflies/

Mom: I'm looking for your help in identifying this plant. It's a volunteer plant that I thought was squash when it first came up, but it grew vertical instead of viney, and is not at all like squash.
The beautiful sunflowers, which are doing their job of attracting birds and bees and butterflies to the garden.
Subscribe to:
Posts (Atom)