Sunday, July 31, 2011

Rosemary and Onion Focaccia

For Christmas last year from my MiL, I received two books. Both were books on my Amazon.com wishlist. One was a bird identification book (so I could put names to all those birds in my garden and at the lake), and the other was Artisan Bread in 5 Minutes a Day.

Earlier this week I made the Boule recipe out of this book. It made four pounds of dough:
3 c lukewarm water
1 1/2 Tbsp yeast
1 1/2 tsp salt
6 1/2 c flour

Mix it all together until moist. Don't knead! Let rise for two hours. Then either put in the fridge, covered, or make some bread!

Then pull off a pound of dough, shape it and let it rise for 40 minutes on a pizza peel covered in cornmeal.

20 minutes before putting the bread in the oven, put a baking stone in the oven and preheat to 450.

Right before putting in the oven, slash the top of the loaf then bake for 30 minutes.

Later in the week, I made pizza.

 Pull off a pound of dough and roll it out to 1/8" thick. Put on a pizza peel covered in cornmeal.
I used half a tomato and several leaves of basil from the farmer's market, olives (quartered), mozzarella and a drizzle of olive oil.

Preheat a baking stone in the oven to 500 20 minutes before baking. Then bake for 10 minutes on a baking stone.

And today, I made Rosemary Onion Focaccia.


Twenty minutes before baking, heat the oven to 425.

Roll out 1 pound of dough to 1/2" to 3/4" thick. Place on a greased cookie sheet, or a silicone baking mat on a cookie sheet.

Saute 1/2 an onion in olive oil until softened. Put on dough, with about 1 tsp of fresh rosemary. Drizzle olive oil. sprinkle with sea salt and black pepper.

Bake for 25 minutes.

Haven't tasted it yet, but it smells delicious!

Home Soil Test and Garden Report 07.31.11

 A couple years ago we bought a home soil test kit, Mosser Lee Soil Testing Kit. It probably came from Lowe's or Ace. The last two years there's been lower productivity in our garden, so I dug out the test kit...

 Looks like we're ok on PH, nitrogen and potassium. The potassium is supposed to be looked at over top of the black squares on the far right.  The phosphorus is so low it doesn't even have a tinge of blue!

I did a lot of researching and I'll add some bone meal at planting time next spring.

Today in the garden, I pulled up the rest of the European Mesclun Salad mix and the kohlrabi and put it in the compost bin. I only got two kohlrabi that were decent enough size to eat.
I planted a fall crop of greens and carrots, and spread around some winter wheat/clover seed in the empty areas of the garden.
I pulled up the green beans because they still hadn't bloomed and were taken over by spider mites. I sprayed them last week and I thought they would come out of it but then the spider mites came back with a vengeance.

From the garden down at Terry's I harvested 3.5 oz of banana peppers.


Inside, I planted lots of herbs and put them on the seedling heat mat so they'll start germinating. Once they get big enough, I'll transplant them and put them in the greenhouse for the winter.

Wednesday, July 27, 2011

Landscaping, Garden Report and Black Bean Burgers

Earlier this week I decided to stop at Lowe's for 12 cubic feet of dirt. I wasn't quite sure it was enough dirt. But I'm glad I didn't buy any more than that. The Garden Soil was 25 pounds a bag (x 8 bags) and the Peat was 40 pounds a bag (x 4 bags). As the Hubs said: "Anna, you had two dead bodies in your hatchback. This probably isn't good on your struts".

 And it wasn't good for the driveway either.
 I spun out. I was laughing the entire time. And then the Hubs noticed a dent in the front bumper and the laughter was supposed to be over. I'm pretty sure the dent came from one of the tree roots that is protruding in the driveway. Which made me laugh even harder.
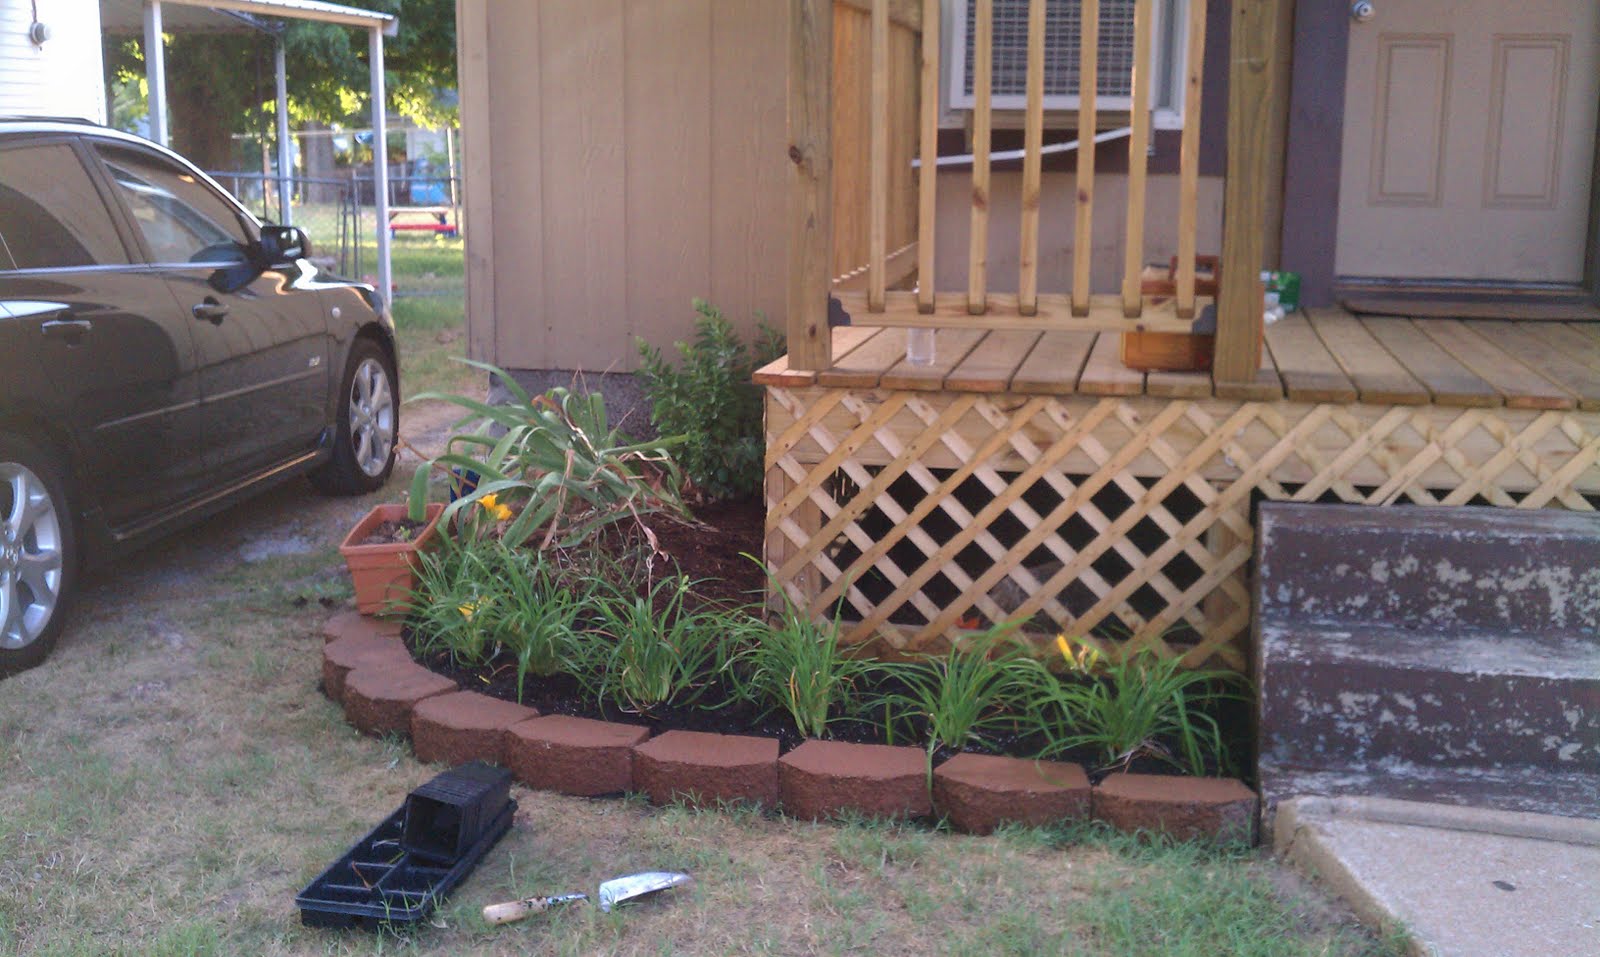
 So the project was landscaping in front of the porch. I rearranged the landscaping blocks that I already had so that they're just one course high. I might go back and get a second course, but this works for now. To keep the dirt from falling under the porch, I covered the open space between the lattice and the ground with composite landscape edging. In addition to the dirt I bought, I also used about 3 cubic feet of other dirt I bought last week to top off the garden beds.
 A couple weeks ago I bought 7 Stella de Oro daylilies from a local nursery. Family Flowers Greenhouse- they're one of those that has several locations around town in parking lots of other businesses. I prefer buying my plants from them instead of big box stores because they're typically in better shape, cheaper, and my sales benefit a local company instead of some corporate chief executive who sits on his ass and knows nothing about gardening.
 Off my soapbox now. I imagined that I would put 4 daylilies on the right side and 3 on the left. But then I decided once I got home that I should pay attention to the suggested spacing (12") and ended up going back to buy another 10 today...
 I put the daylilies close to the front of the bed so I can put taller plants like irises in the back. I almost bought a Japanese maple to put on the right side, but decided against it. I see some rearranging of existing plants in my future. Which is sad because it took three years for the peonies, yucca and irises to bloom.
Today I harvested:
Black Cherry tomatoes: 2.5 oz (5 tomatoes)
Banana peppers: 2 oz (about 5 small peppers)
Golden Marconi peppers: 1 oz (one pepper)

and now on to Black Bean Burgers. There are several blogs I follow and so I've seen several different versions of these burgers. I made up my own recipe as I went along.

Black Bean Burgers

1 can black beans, rinsed and drained
1 can of Rotel, drained
1 small onion, diced
2 cloves garlic, diced
2 banana peppers, seeded and diced
1 Golden Marconi pepper, seeded and diced (I don't expect you to have these, so use another banana pepper.)
cumin
garlic powder
salt and pepper
Sriracha sauce
chili powder

In a skillet, cook the garlic, onion and peppers until tender then turn off the heat.

Meanwhile, smash up the drained beans in a bowl (a potato masher is a great tool for this, otherwise a fork is good).

Then add the rotel, onion mixture, and spices to taste.

I apparently didn't get the beans and rotel drained enough because I had to add a cup of cornmeal to soak up the juices.

Heat up a nonstick skillet (the same one used for the onion mixture) and drizzle a little olive oil in it. Divide the batter in fourths and cook until brown on each side. This is the same way I make falafel, instead of frying them in oil.
 The Sriracha gave it a sneaky kick. I topped the burgers with feta cheese and had a glass of Mad Housewife Cabernet Sauvignon. No joke, the label says "This is your time [...] The dishes can wait. Dinner be damned." It's been one of those kind of weeks.
Lesson for next time: drain the beans better!

Monday, July 25, 2011

Walleye Gumbo

Last night we tried another recipe from the 1998 NAFC Members' Cookbook, Walleye Gumbo.

We increased the amount of walleye, because the Hubs thawed a package that had about 2-3 pounds in it.


Walleye Gumbo

1/2 lb bacon
Flour
8 c chicken broth
3 smoked sausage links, cut into 1/4" pieces
1 green pepper, chopped
1 c celery, chopped (about 4 stalks)
1 c mushrooms, sliced
1 c carrots, chopped
1 Tbsp garlic powder
1 Tbsp pepper
1 Tbsp oregano
1Tbsp thyme
1Tbsp cayenne pepper
2 bay leaves
1 lb walleye fillets, cut into 1/2" to 1" pieces
can of stewed tomatoes
1 c minute rice (I used 5 minute rice because that's what we had)

Brown bacon. Drain and set aside, keeping grease in pan. Heat bacon grease until it begins to smoke, then add an equal amount of flour. Whisk until mixture turns the color of a "brown paper bag" (no joke, that's what the recipe says! I guess this is like a roux?).

In a stockpot, cook the sausage. Remove and set aside.

Heat the chicken broth in the stockopt. Add the bacon grease mixture.

Add the veggies and spices. Cook for 15 minutes.

Add fish, sausage, bacon and tomatoes. Cook for 10 minutes.

Remove from heat and add the rice. Wait a few minutes for it to soften before serving.(Or add 5 minute rice halfway into the cooking time for the meat.)

This was pretty good. It smelled amazing. I had leftovers for lunch today.

Music Monday: Jason Aldean - Fly Over States

I live in a "Fly Over State" and I wouldn't have it any other way. I live in a small city, but it's still difficult to see the stars through the city lights and track down the moon past all the houses and buildings.

Sunday, July 24, 2011

Garden Report 07.24.11

 There are a lot of cherry tomatoes setting on.
 and Thessaloniki tomatoes.

and banana peppers.

Today I saw the praying mantis again, but I didn't have my camera and by the time I got back outside with it he was in hiding again. I have been looking for him all week but didn't see him because he is no longer green. He now has on his hunter camo!

The tomatoes and green beans have been attacked by spider mites. I sprayed them down with pyrethrin and dipel dust. Hopefully that gets rid of them...

The Japanese beetles arrived this week but they aren't near as bad as last year.

This week I reapplied fertilizer to select plants. As a control group, I have only fertilized the plants that have the name tags. I can't really tell a difference in growth or health between fertilized and unfertilized plants. I also put calcium nitrate around some of the peppers because I noticed some blossom end rot.

I put some bagged dirt in the root veggie bed. The dirt in the beds settled quite a bit since it was put in.

Today, I also started working on the landscaping in front of the house. I rearranged the landscape block so it curves around to the porch steps. I'm thinking of putting landscape edging along the backside of it so dirt doesn't escape under the porch. I can't decide if I want one or two layers of block. A second layer will cost about $50...

Thursday, July 21, 2011

Peach Pie

This recipe comes from The Taste of Home Baking Book that my roomie Amanda gave me. I made the pie Monday night.

Classic Pie Pastry
For double-crust pie:
2 c all purpose flour
3/4 tsp salt
2/3 c shortening
6 to 7 Tbsp cold water

Combine the flour and salt. Then cut in the shortening with a pastry blender until it forms coarse crumbs. Add water a tablespoon at a time until a ball forms. Refrigerate for 30 minutes.
Divide dough into two balls, with one slightly larger. Roll out and transfer to a 9 or 10 inch pie plate. (The easy way to do this: after you roll out the pie crust to the desired thickness, roll the pie crust around the rolling pin and then unroll it across the top of the pie pan.)
Trim pastry even with edge of pie plate.

Then add the filling:
5 c sliced fresh peaches
2 tsp lemon juice
1/8 tsp almond extract
1 c sugar
1/4 c cornstarch
1/4 tsp ground nutmeg
1/8 tsp salt
2 Tbsp butter

Combine peaches, lemon juice and almond extract. In separate bowl, combine sugar, cornstarch, nutmeg and salt. (I just mixed all this into the peaches because I didn't want to dirty up another bowl.) Add to peach mixture and mix. Pour into crust. Dot with butter.

Roll out the top crust, place over filling and flute edges. Cover edges loosely with aluminum foil.

Bake at 400 for 40 minutes. Remove foil and bake an additional 10-15 minutes or until crust is golden brown. Cool on a wire rack.

The peach filling recipe also called for 1/2 tsp grated orange peel, but I didn't add that. I forgot to add the salt to the filling and could definitely tell.

And.... I didn't take a picture because 1) it was late and I was ready for bed, 2) I can't flute pie edges and 3) The pie is almost gone. It's really good for breakfast.

Tuesday, July 19, 2011

Garden Report 07.19.2011

Last night the rain barrel ran out of water. I've been watering at least once a day, sometimes twice a day, for almost the entire month of July. I'll water in the morning, and then when I come home in the evening everything is wilted again.
This morning I rolled out the hose that's attached to the house to water. That's a lot more pressure than the rain barrel! Hopefully everything got enough water and I don't have to water this evening.
There are a couple Black Cherry tomatoes that are starting to blush! This means tomatoes are coming soon!

Last night, I roasted the remainder of the root vegetables that I pulled up on Saturday in olive oil, salt, pepper, garlic powder and basil. I also made a corn chowder and peach pie. I'll post the recipes later this week.

Monday, July 18, 2011

Saturday, July 16, 2011

Putting Food by: Peach Jam

Last week I didn't feel like waiting in the 1/2 hour line for peaches at the farmer's market, so I bought a couple at the grocery store. They satisfied my peaches need temporarily. This week at the farmer's market, they had a peck of seconds for $8, or (firsts?) for $12. I knew I wanted them for jam, so I bought the seconds. And then I ate one when I got home. It was so juicy and tasty and the ones I bought at the grocery store last week don't even compare in flavor.
I now have 7 pints of peach jam on the kitchen counter cooling. There's enough peaches for one more batch (which would make close to 4 pints of jam), and I already have them cut up and stirred in the lemon juice, but I ran out of sugar. I don't feel like going to the grocery store for a third time today (the first time I forgot the lemons and pectin and had to go back a second time), so I'm thinking I'll just eat them this week in oatmeal.

For future reference, a peck is about 10 pounds of peaches. A batch of jam requires 3 pounds. That's before peeling and pitting. After peeling and pitting, you need 4 cups of chopped up peaches.

I'm not going to go through with specific steps, because you need to follow the directions in the pectin box. Different pectin may have different directions.

To make peach jam, peel and pit the peaches. Then put in a stock pot with the pectin. Bring to a boil. Stir in the sugar. Bring to a boil again. Put in jars and process.

 The way I peel peaches is the same way I peel tomatoes. Boil water in a stock pot, put some peaches in the water until their skins crack, then plunge them into ice water.
peaches in water, waiting for it to come back to a boil

put in ice water

Working on the 4 cups of chopped peaches.

This is the rest of the peaches.

I could have canned 8 pints, but my water bath canner only holds 7 jars. And I wasn't expecting to have a whole other pint. I used an old spaghetti sauce jar. I put it in the fridge and we'll eat that first.


Also today, I pulled up the rest of the carrots and beets. Harvest totals from today:
Golden beets with greens (because that's how they are sold at the store): 7 oz
without greens: 4 oz
Chioggia beets with greens: 2.5 oz
without greens: 1.5 oz
Chantenay carrots: 11
Tonda di Parigi carrots: 7.5

That brings the yearly totals to:
Golden beets: 7 oz (4.5 without greens)
Chioggia beets: 32 oz (19.5 without greens)
Chantenay carrots: 13 oz
Tonda di Parigi carrots: 9.5

The beet seeds were from last year. The chioggia beets paid for themselves. The golden beets did not. If I had tracked last year, they probably would have paid for themselves though.

The carrots seeds were new this year. Neither one paid for themselves.

I'm looking into planting some carrots for the fall. I need to get some fall mixed greens in the ground soon too.

Monday, July 11, 2011

Putting Food By: Blueberry Jam

It's blueberry season! At the farmer's market on Saturday, I bought 2 quarts of blueberries with the intention of canning some jam. Mmmm.

I'm going to outline the steps I took to make jam, but if you decide to can your own food, PLEASE read the directions in the pectin box and follow them to a "T". If you don't, you could introduce bacteria into your canned food, ruining it and wasting all that time!

To start off, I get everything out that I know I'll need. Canning, especially jams and jellies, is a quick process, so you don't want to be digging around for your canning funnel after you've already taken the boiling jam off the stove!

Dishtowel to set hot jars on, canning funnel, jar rings

Everything ready on the stove: water bath canner, a kettle of boiling water, a small saucepan for lids, a pot for the jam.
 This is when I really wish I had a 6 burner stove. I only need 4 burners, but it would be nice to have a little extra room.
Lids in water ready to sterilize. I put water over them and bring them to a boil and then turn them off.
Clean jars getting ready to go in the water bath canner.
 I've never been able to get that white residue off my canner. I think there's something in the water here.
Blueberries, pectin, sugar and directions!
 
Whew! I'm already sweating and haven't even started!
 Before you start anything:
  • Wash and rinse the jars
  • Start the water bath canner to boiling. This is a huge pot. (Sometimes the Hubs has to help me dump it back out in the sink because it's so heavy!) It is A LOT of water and takes FOREVER to fill and boil.  
Canning is the only time I wish we didn't have a low-flow kitchen faucet.

Start by rinsing the berries, and removing any stems. (The de-stemming part was actually on the pectin directions. You know that means someone didn't de-stem their berries and called Sure Jell about it. Kind of like the stupid person who blamed McD's for their hot coffee spill. Definitely not a pioneer woman caliber of woman!)
 This was fun. I got to crush berries with a potato masher, one cup at a time.

 Then the berries went on the stove to boil with pectin. Then sugar got stirred in, and boiled some more.
 Then the canning! This part always makes my heart race because it's so fast. It probably doesn't have to be as fast as I make it, but there's hot jars and hot jam and a hot kitchen and I just want it to be over with!

This recipe made 6 half-pint jars of jam, with a little leftover. It was so good I could eat it with a spoon (and I did!)

According to pectin directions, process in the water bath canner. Then pull out and place on a towel, with space between the jars. Within 5 minutes all 6 had "popped", which means they sealed and are safe to store. If any of them didn't seal, they would need to be reprocessed in the water bath canner, or put in the fridge to eat first.

This is what $12 of blueberries, 4 cups of sugar and a box of pectin look like. Definitely a lot tastier than any store-bought jam. After the jars, cool I'll label them with the year and contents.

Start to finish, this probably took 1-1/2 to 2 hours.

Music Monday: The Killers - A Dustland Fairytale


It amazes me how the music video for a song can be completely different from what I was expecting the song to be about. I always thought this song was a lovesong. I wonder what the band members were thinking when they wrote this song? Were they looking forward to the music video of a man who committed murder but was still accepted by his sweetheart from long ago? I'd like to know if they work backward from a vision of a music video, or if the video comes later.

This video also makes me want to re-read The Outsiders by S.E. Hinton. I haven't read it since high school, but this video reminds me of it.

Sunday, July 10, 2011

Putting Food By: Corn

Sometimes I wonder if I could be a pioneer woman, and put enough food by to keep my family eating during the winter. Then I have days like today and I think it wouldn't be too difficult.
The last couple weeks I've purchased a dozen ears of corn from the farmer's market. We eat 3 or so, and then I freeze the rest.
This is a good website for learning about preserving food: http://uga.edu/nchfp/
It's the National Center for Home Food Preservation, with links on freezing, canning, smoking, etc.

To freeze the corn:
Shuck it.
Keep the shucks for the compost pile!
Side note: You know it's organically grown when you find worms in the ears of corn and in the bottom of the bag!
For blanching the corn, I use a steamer pot. This is the same pot I use for cooking tamales. I fill it up so the water is about 1/3 of the way up the steamer basket. Start the water before starting to shuck the corn.

According to the NCHFP website, blanch the corn in boiling water for 4 minutes.
Then put in ice water for 4 minutes.
 Then cut the corn off the cob. This process is easier if you put the corn in the center part of an angel food cake pan. The cob is held in place, and the corn doesn't fly all over the kitchen!
 Then I put the corn into bags and vacuum sealed it, wrote the date on it, and stuck it in the deep freeze. So far I have 6 bags of corn!

I thought about canning the corn, but I don't have a pressure canner yet, so canning is not a possibility.

While I was waiting for the water to boil, I went out and checked on the garden.

I bought some Stella D'Oro Daylilies yesterday to put in front of the porch, and two daisies and coreopsis to fill in some holes in the front planters.
 I also checked on the praying mantis. I've only been able to find one of the three from last week. Maybe he ate his siblings? He's a little hard to see, but he's kind of in the middle of the picture.

Related Posts Plugin for WordPress, Blogger...